Computational Setup #
Note: These steps take time! Read the instructions in advance, and don’t wait until the last minute.
This guide walks you through the steps necessary to set up your computer for the work you will do in this course. Once you have completed this setup, you should have all of the software tools you need to complete the worksheets and projects in this course.
These instructions are only for Windows 11. This is the only supported operating system in the course. You are free to run macOS or Linux, or otherwise deviate from the steps below if you want, but there is limited help available for these operating systems. If you are using macOS or Linux and something goes wrong, we can’t guarantee that we can help you fix your issue, and you’re ultimately responsible for getting to a correct setup.
We have split each step into a Context section that explains what you are doing and why, a Directions section that explains what to do, and a Check section with instructions for you to test that you have completed the step successfully. Reading the Context section is optional - it simply explains why you are doing each step.
The setup has quite a few steps and may appear daunting at first. We ask that you try to follow these instructions as closely as you can, because we have done quite a bit of testing with these instructions and have confirmed that they work reasonably well for most student setups. If you run into any issues, please checkout the troubleshooting section, which has solutions for common issues. If you need our help, it will be very helpful for us to know if and how you did anything differently from what these instructions specify. We are happy to provide help if you get stuck, so please do not hesitate to ask!
Install and Configure Windows Subsystem for Linux (WSL) #
Context #
Most previous iterations of this course were taught in Ubuntu Linux (website), and many subsequent computing courses are taught in a Linux environment. Because of this, much of our actual coding work will take place in an approximation of an Ubuntu system within your Windows operating system. Windows Subsystem for Linux (WSL) provides the infrastructure needed to install and run Ubuntu on Windows. In this step, you will install and configure both WSL and Ubuntu.
Directions #
First, you need to install WSL on your system. You can then install the appropriate version of Ubuntu for this course.
Install WSL #
From the Start menu, open PowerShell as an administrator, as shown in red below:

A prompt may appear on screen - if it does, click Yes to move on.
This should open a window that looks like what you see below. Make sure that “Administrator” is shown in the window title (in red below):

In this window, type wsl --install and run the command by pressing Enter. You
may get another prompt, and you can click Yes to move on again.
Sometimes, the process can fail, in which case you should try running the command again. Make sure that what you see at the end of running this command shows that it was successful (in green below) rather than that something failed or was denied (in red below).

Once this is done, restart your machine.
Set up the Ubuntu user #
If everything has gone well, you should be able to select and launch the Ubuntu app from your Start menu. The first launch may take a bit of time to start up.
When you first launch Ubuntu, you will be prompted to create a new username and password, which is used to run administrative commands on Ubuntu. Do not close this window before you have completed this process, because it can break your setup.
The username and password can be whatever you’d like, but be sure to remember your password as you’ll need it throughout the course. When you are typing your password, nothing will be shown - not even dots/symbols for each character you type (shown in red below). You’ll need to type the same password twice to avoid getting locked out by a typo.
These do not have to match what you use for Windows, and can be whatever you’d like. Note that when you are entering your password, the text you enter will not be shown, but you will be asked for your password twice to avoid typos.
You may also see a firewall warning when first starting Ubuntu. Allowing connections with the default configuration (on private networks only) is fine.
Check #
To test that everything works, launch Ubuntu. You should see a line ending in
$ with a blinking cursor after it, and you should be able to type text. Try
typing ping olin.edu and pressing Enter. You should see lines that look like
this:
PING olin.edu (54.225.220.247) 56(84) bytes of data.
64 bytes from ec2-54-225-220-247.compute-1.amazonaws.com (54.225.220.247): icmp_seq=1 ttl=127 time=17.3 ms
64 bytes from ec2-54-225-220-247.compute-1.amazonaws.com (54.225.220.247): icmp_seq=2 ttl=127 time=22.8 ms
64 bytes from ec2-54-225-220-247.compute-1.amazonaws.com (54.225.220.247): icmp_seq=3 ttl=127 time=22.0 ms
A new line will appear around once every second. You should be able to stop this program by pressing Ctrl-C. (When running commands this way, Ctrl-C stops the current program instead of copying to the clipboard, as you might be used to.)
Install Python/Anaconda #
Context #
Because virtually all code for this course will be written in Python, you will need to have the Python programming language installed on your computer. The officially supported way to install Python in this course is with Anaconda, which is a bundle of software that includes the Python programming language, a collection of useful additional libraries for data science, and some helpful support tools. If you know what you are doing, you are free to look up and use a different installation approach, but if something goes wrong, it is unlikely that we can provide support. If you go the Anaconda route, you should install the Individual edition, which is free to download and use.
Directions #
These directions are adapted from the official Anaconda Linux installation instructions. If something goes wrong with the installation process, we recommend that you check there for a fix before asking for help.
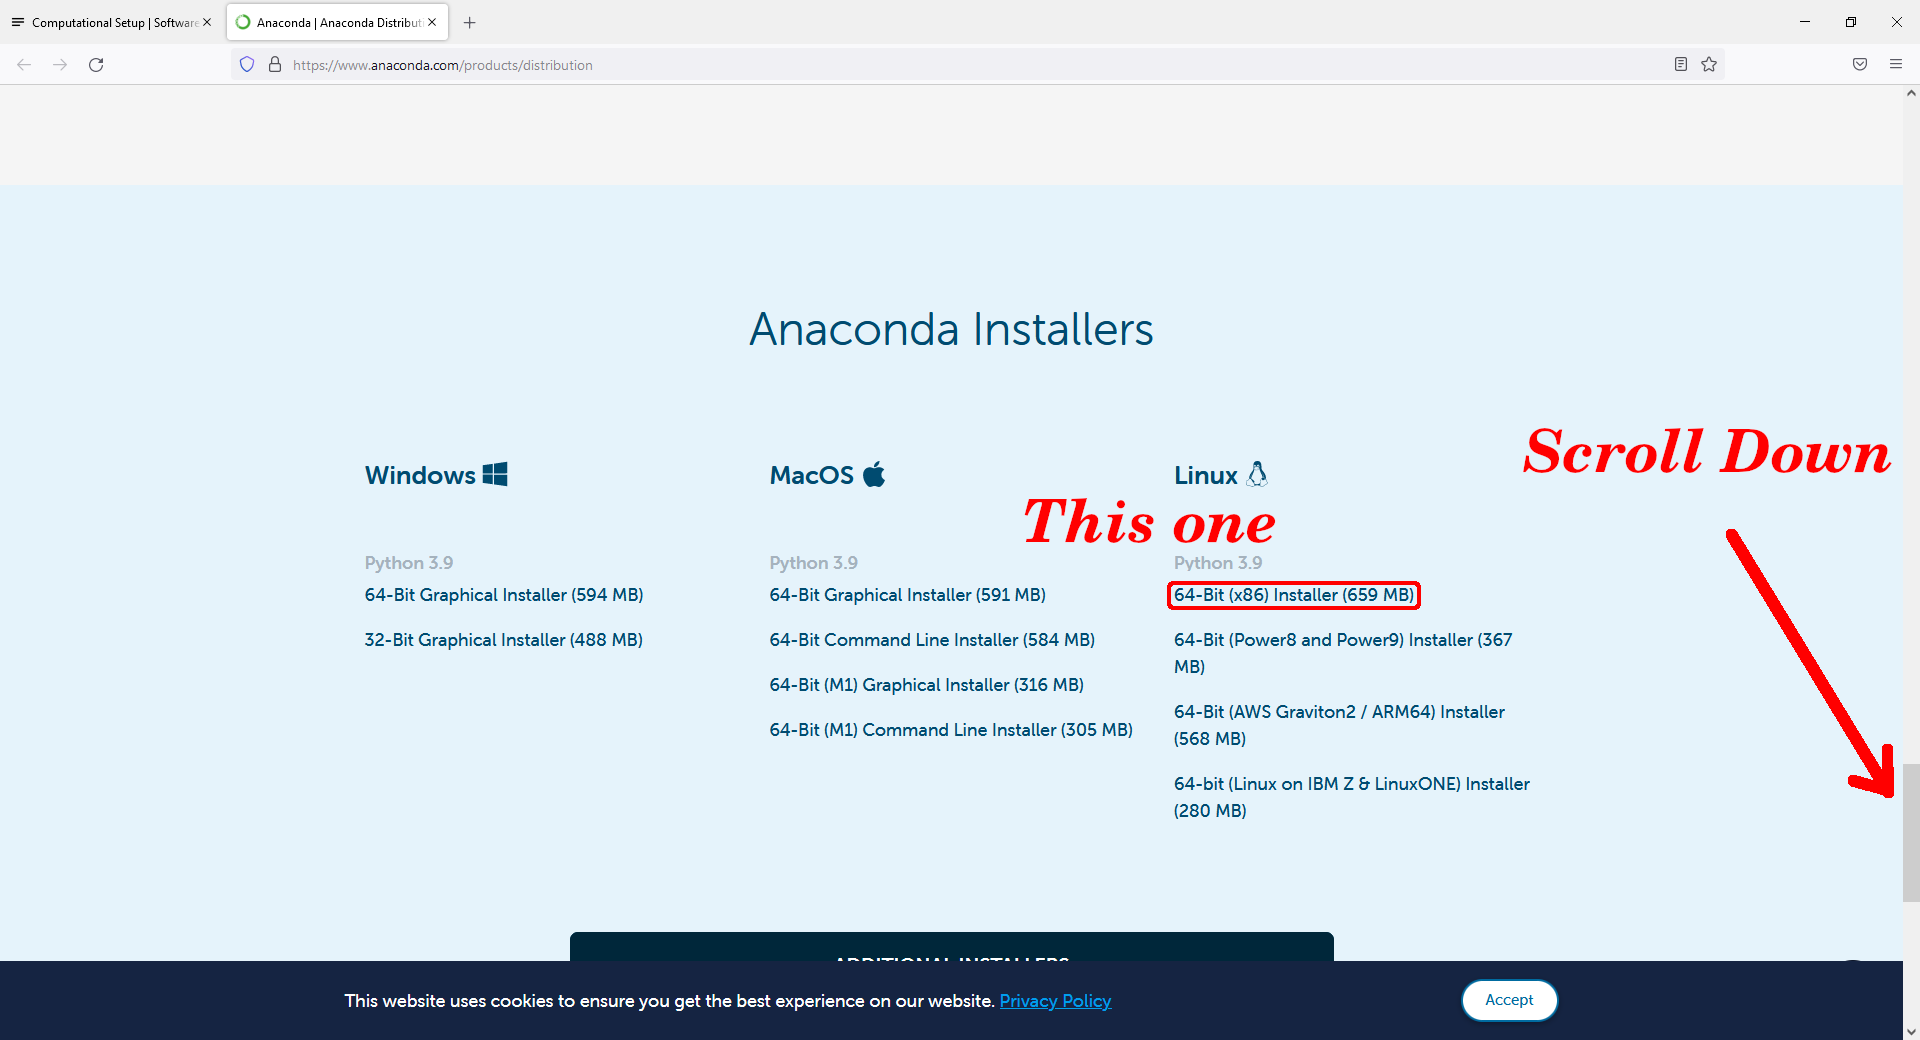
Head to Anaconda’s downloads page. Do NOT click the big button at the top of the page that says “Windows”. Instead, scroll to the bottom of the page located the section titled “Anaconda Installers”. Under the “Linux” column in this section, locate the link for the “64-Bit (x86) Installer” with the latest Python version available. Right click this link and copy the link location. Do not download this file normally.
Now launch Ubuntu app on your machine. Once Ubuntu has started, you should be
able to type in the window. Type wget into the window (note the space at the
after wget), then right-click in the window to paste the URL that you copied
earlier. Press Enter to run the command. You should see a dialog in the window
as the file downloads. Look for a message that says something like
'Anaconda3-20XX.YY-Linux-x86_64.sh' saved.
Once you have downloaded the file, type bash Anaconda (note there is no space
at the end) and press Tab. You should see this autocomplete to the name of the
file you downloaded earlier. If all has gone well, your prompt should look like
the following screenshot:

Press Enter to run the command, which will start the installer.
You will be prompted to review the license agreement. Press Enter to view the
agreement. The agreement text will likely not fit in your window; you can
press Space to move forward one page until you reach the end. At the end of
the agreement, you will be prompted to type yes or no based on whether you
accept the agreement. If you do not want to agree, contact the teaching team
and we can help you with an alternate, non-Anaconda installation process.
If you choose to proceed, you will be prompted with a default installation location. This location is fine, and you can accept it simply by pressing Enter. Otherwise, you can specify a new location or press Ctrl-C to abort the installation.
The installation may take a while. Please be patient.
The installer will then ask if you want to initialize Anaconda. Answer yes to this question, as it sets up your Ubuntu installation to use Anaconda’s version of Python by default.
Check #
To test if the installation succeeded, close Ubuntu if it is already running,
then launch Ubuntu. If the installation was successful, you should see a prompt
that starts with (base) after any welcome message that is shown.

If you don’t see (base), try typing conda and pressing Enter. If you see
something like conda: command not found, then the installation did not
complete successfully. You should be able to try the installation instructions
again. If you instead see output that starts with usage: conda [-h] [-V] command ..., then you may not have answered “yes” to having the installer
initialize Anaconda. In this case, you should be able to run conda init, and
then close and re-launch Ubuntu.
Install Quarto #
Context #
Throughout this course, you will be working with a tool called
Jupyter. Jupyter notebooks are neat and interactive way
to integrate text and code together, popular in data science. Unfortunately,
the ipynb (Interactive PYthon NoteBook) format is notoriously difficult to
work with in version control systems such as git,
another tool you will use in this course.
For that reason, we have you install Quarto, an open
source publishing system. Quarto has a file format called qmd (Quarto
Markdown), which we use as an intermediate format for managing Jupyter
notebooks.
Directions #
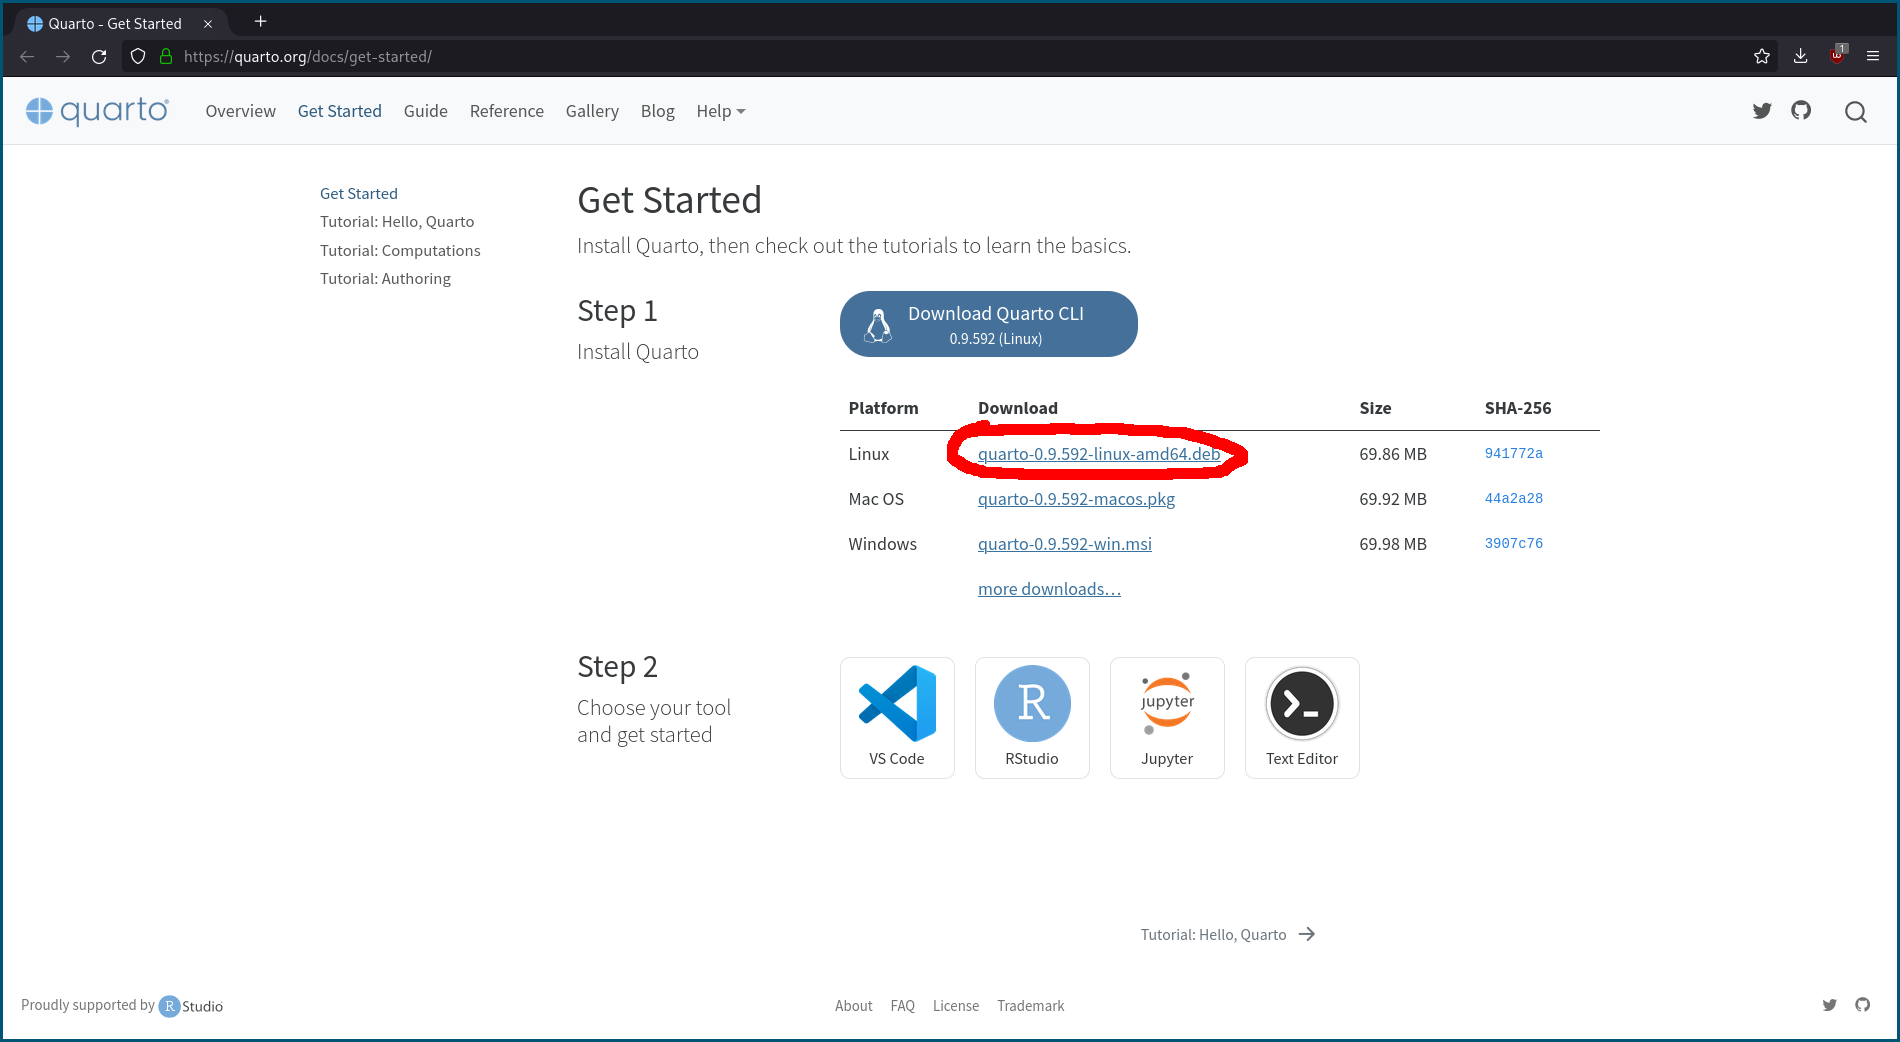
Navigate to the Quarto Getting Started
page and find the download link for the Linux (not Windows) version. It
should look something like quarto-X.X.XXX-linux-amd64.deb. Right click this
and select copy link or copy link address depending on your browser.
In a WSL window, type at the prompt wget (note the space after wget) and
right click to paste the URL you copied earlier. This will look something like:
wget https://github.com/quarto-dev/quarto-cli/releases/download/vX.X.XXX/quarto-X.X.XXX-linux-amd64.deb
Run this command by pressing Enter. You should see it download. Once the
download is finished, type sudo apt install ./q and press tab. It should
auto complete to the Quarto file you just downloaded. Press Enter to run this
command. It will prompt you for a password. This is the Linux password you
setup earlier; it is not necessarily the same as your Windows password.
Check #
To test that Quarto installed successfully, run the following command in your WSL window:
quarto -h
If all is good, Quarto should print out a help message. If instead you see:
quarto: command not found
Try starting again from the Quarto instructions. If that does not work, see a CA.
Install VS Code #
Context #
It is possible to write Python code in a plain text editor, such as Notepad, but you will likely find that this is a rather tedious and difficult process because plain text editors have no knowledge of Python’s formatting or syntax. For this course, we will use a code editor called Visual Studio Code (often called VS Code). We recommend this editor because it is widely used, free, and able to run on Windows, Mac, and Linux.
Directions #
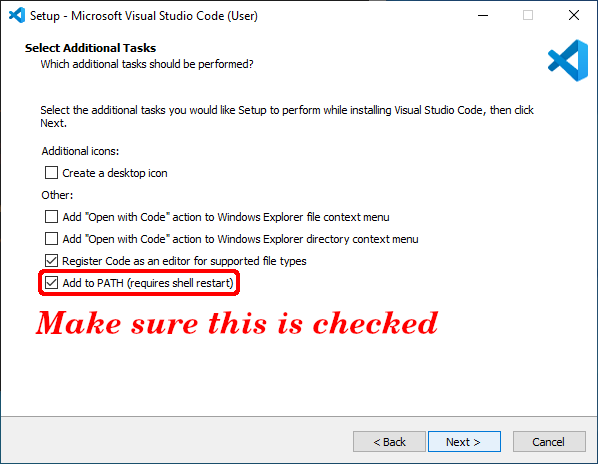
Go to the VS Code Download page and click the Windows button to download the installer. (By default, this will download the 64-bit User Installer whose link is just below the download button.) Run the installer, using all of the default options. Most importantly, make sure that “Add to PATH” remains checked. (You can uncheck “Launch Visual Studio Code” at the end of the install process, as you should have the other components installed before configuring it.)
Check #
To test that you have installed VS Code correctly, you only need to make sure that it launches for now.
Configure VS Code #
Context #
While you can run VS Code from the Start menu as you would with any other program, there are some oddities about the way it works with Anaconda and WSL that will likely cause unintuitive issues if you run it this way. Because of this, you should configure VS Code to work with Anaconda’s version of Python and with WSL. You will do this by installing extensions for VS Code.
Directions #
Launch Ubuntu in GWSL by opening the GWSL app, selecting “Linux Shell”, and
choosing your version of Ubuntu. Then run code (type it in and press Enter).
The first time you run this command, it will do some setup on WSL, so it may
take awhile.
If you just installed VS Code and you see code: command not found, restart WSL
by opening the GWSL menu and navigating to GWSL Distro Tools -> Reboot Ubuntu.
Install Remote WSL Extension #
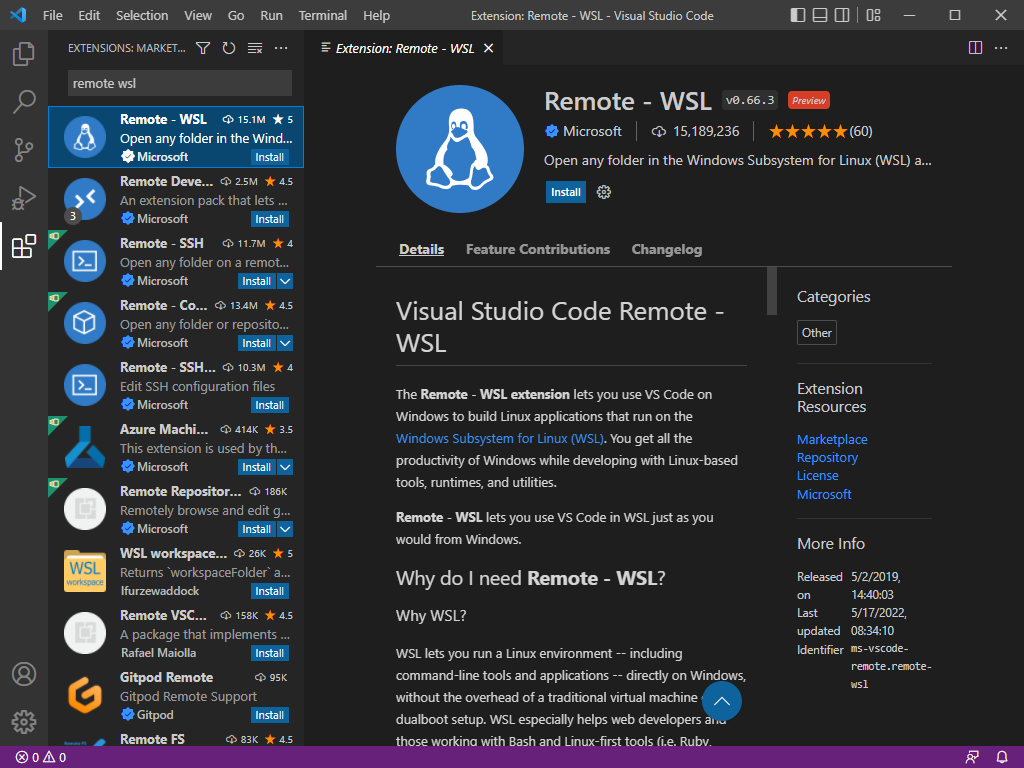
Once it has started, you will need to install the Remote WSL extension. Navigate
to the extensions menu via File -> Preferences -> Extensions or by pressing
Ctrl-Shift-X. Then search for and install the extension “Remote - WSL”. If you
already installed the “Remote - WSL” extension when opening VS Code earlier, you
do not need to do so again.
After installing the Remote WSL extension, you should see a small green box in
the bottom left corner of VS Code. Click this green box. It will open a menu in
the top of VS Code. Select the option which says New WSL Window.
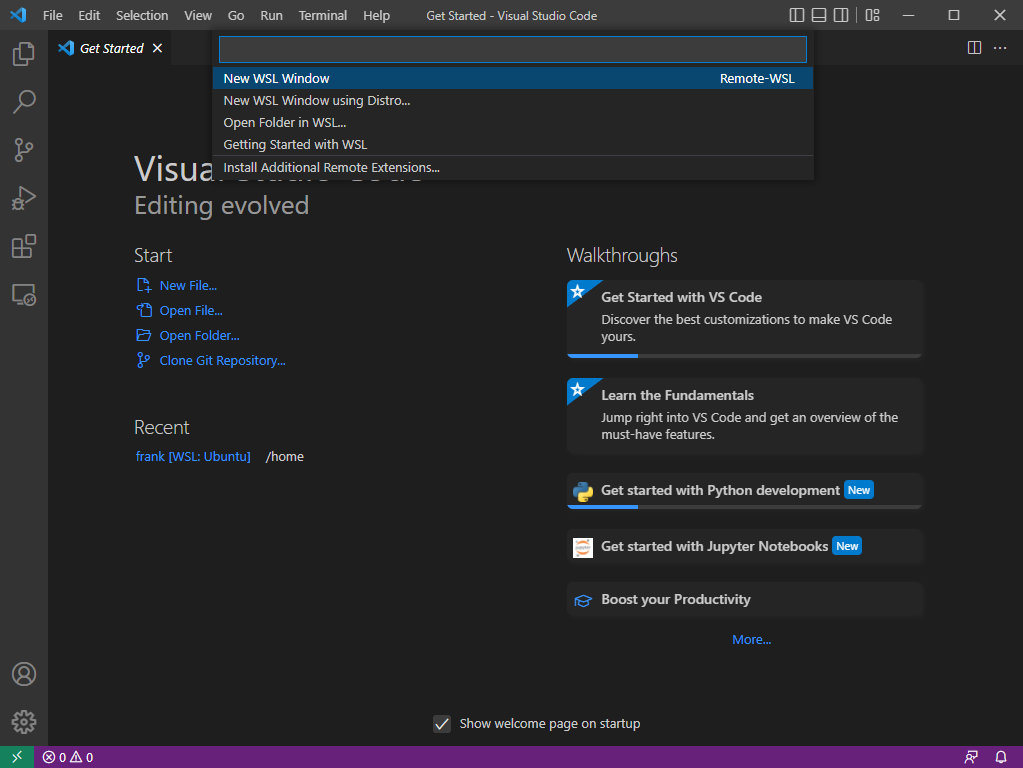
A new VS Code window should open. In the bottom left, the little green box
should now say WSL: Ubuntu.
Install Python Extension Inside VS Code Remote #
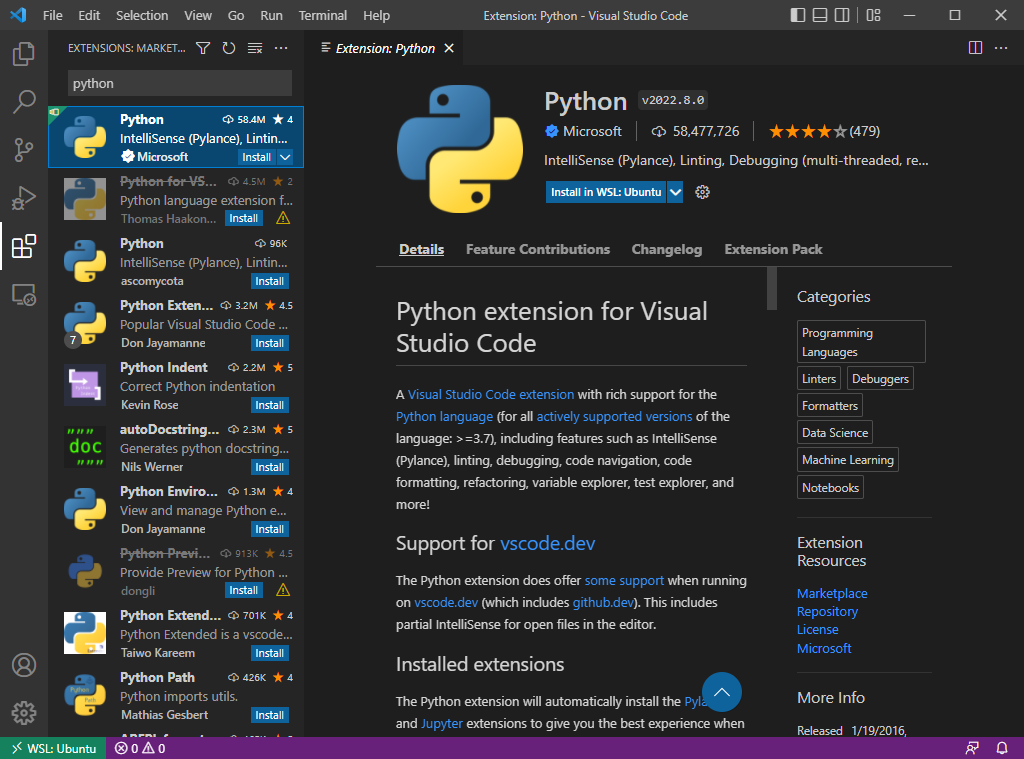
Now you need to install the Python extension for VS Code. Inside your VS Code
window (the one which says WSL: Ubuntu in the bottom left), navigate to the
extensions menu via File -> Preferences -> Extensions or by pressing
Ctrl-Shift-X. Search for the Python extension. Click the button which says
Install in WSL: Ubuntu.
Set Up Automatic Formatting #
In assignment 0, you will learn about autoformatting code and be introduced to a tool called autopep8 which helps standardize various conventions, especially those revolving around whitespace usage in code.
You can set up VSCode to automatically run the autopep8 command (or
automatic formatter) each time that you save a file; this will ensure that you
no longer have to run it manually prior to submission, reducing the chances
of forgetting to do so before submission.
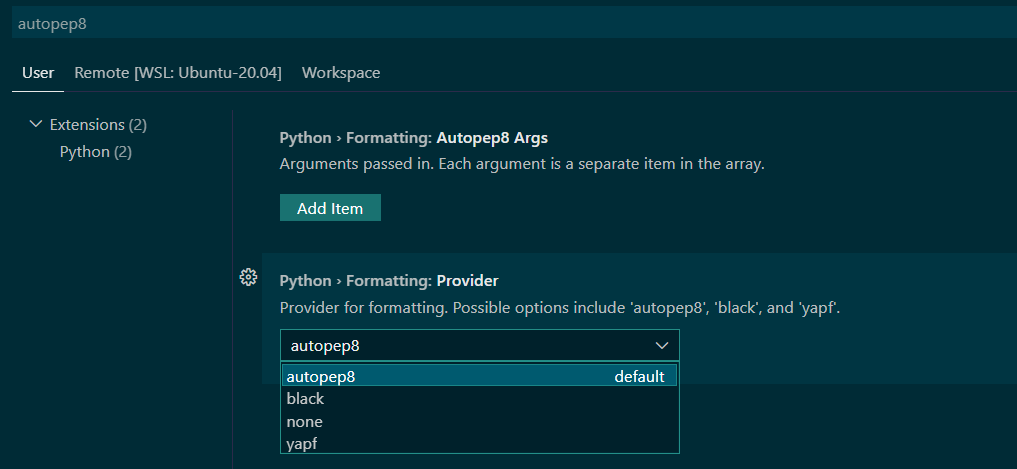
- Click on the settings gear in the bottom left of the VSCode window & navigate to settings (alternatively, hitting Ctrl+, will work).
- Search for
autopep8. - Under the option that says Python > Formatting: Provider, select autopep8.
- Search for “format and save”.
- Check the box that says “Editor: Format on Save”.

Pylint Checker #
You will also learn about using a tool called pylint in order to check for
additional style conventions like variable naming convention.
While VSCode cannot automatically fix a majority of these issues, you can set it up to mark what lines do not match expected pylint guidelines; it is still highly encouraged to run the pylint command on all of your files before submission, even if you have this set up.
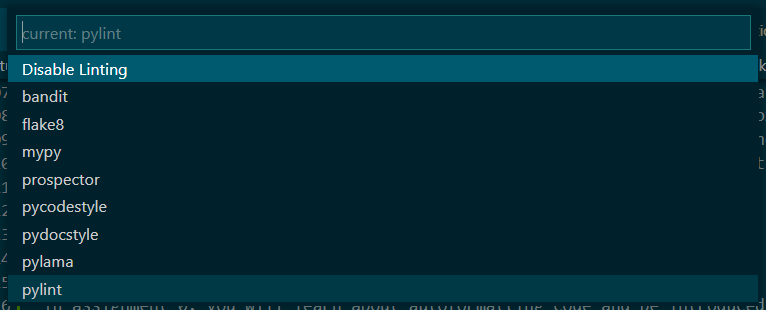
- Hit Ctrl+Shift+P to bring up the Command Palette.
- Type “Python: Select Linter” into the textbox that is brought up.
- Select pylint from the dropdown of various linting conventions..
Check #
To check that you completed this step properly, launch VS Code if it is not
already running by running the code command in Ubuntu. Once the VS Code window
opens, make sure that the lower left corner shows a green box that says “WSL -
Ubuntu”. If you do not see this, open the extensions menu as described above and
make sure that the “Remote - WSL” extension shows as installed.
Then, open a new file from the File menu or by pressing Ctrl-N. Then save the
(blank) file from the File menu or by pressing Ctrl-S. You can save the file
under any name as long as it ends in .py. Once you do this, you may see a
message that says “Select Python interpreter” as a popup or by the green box
that says “WSL - Ubuntu”. Choose the interpreter that ends in “(‘base’: conda)”
and make sure that it appears in the lower left corner. If you do not see this
prompt, make sure that the “Python” extension is installed.
Create a GitHub account #
Context #
In this course, we use a tool called Git, which is a system for managing versions of your code. To share your code with others, it’s helpful to use a hosting service that stores an online copy of your code and its history. (The copy does not necessarily have to be publicly accessible, though this is often the reason for hosting your code online.) For this purpose, we will use GitHub. In this step, you will create a GitHub account.
Directions #
If you don’t already have a GitHub account, go to https://github.com and create an account. Feel free to use any email address you want (or create one just for this account), but remember which email address you use, as you will need it when configuring Git on your computer (which is a later step in this guide). Your username does not have to be related to your actual name at all. That being said, like most usernames, it will be publicly visible, so if you plan on sharing code with the world, make sure you choose a username that you would be comfortable with others seeing.
Check #
To test that you have correctly set up your GitHub account, go to
https://github.com/username, replacing username with the username you
created. You should see a profile page for your username. If you get a 404 page,
you may not have completed the account creation process.
You may also want to check that you can log into your account.
Configure Git #
Context #
In order for Git to operate properly, and to make sure that services like GitHub can attribute your work to your account, you need to configure Git with your name and email address.
If you try to do other operations in Git without having set up your name and
email, you will see a message that starts with something like *** Please tell me who you are. and whatever operation you were trying to do will fail.
You also need to set up Git to use VS Code for some of its operations.
Directions #
To set your name in Git, start Ubuntu in GWSL by opening the GWSL app, selecting
“Linux Shell”, and choosing your version of Ubuntu. As you have done previously,
you can run commands by typing text into the prompt you see and pressing Enter.
Run the command git config --global user.name "Alan Turing", substituting your
name for Alan Turing (but leaving the quotes in place). This can be any name
you want, though you should probably avoid using a name that may be seen an
attempt to impersonate someone else (e.g., “Bill Gates”).
To set your email, run git config --global user.email "alan@turing.org",
substituting your GitHub email address for alan@turing.org. It’s important
that your email match the one that GitHub has, because a mismatch can make Git
fail in unintuitive ways.
To set Git to use VS Code, run git config --global core.editor "code --wait".
Again, leave the quotes in place.
If you mistyped anything in quotes (your name, email, or code --wait) you can
run that command again with the correct name/email to fix the typo. If you
mistyped user.name, user.email, or core.editor in the commands, you can
use git config --unset user.naem (replacing user.naem with whatever you
mistyped earlier) to remove that setting, and try again.
Check #
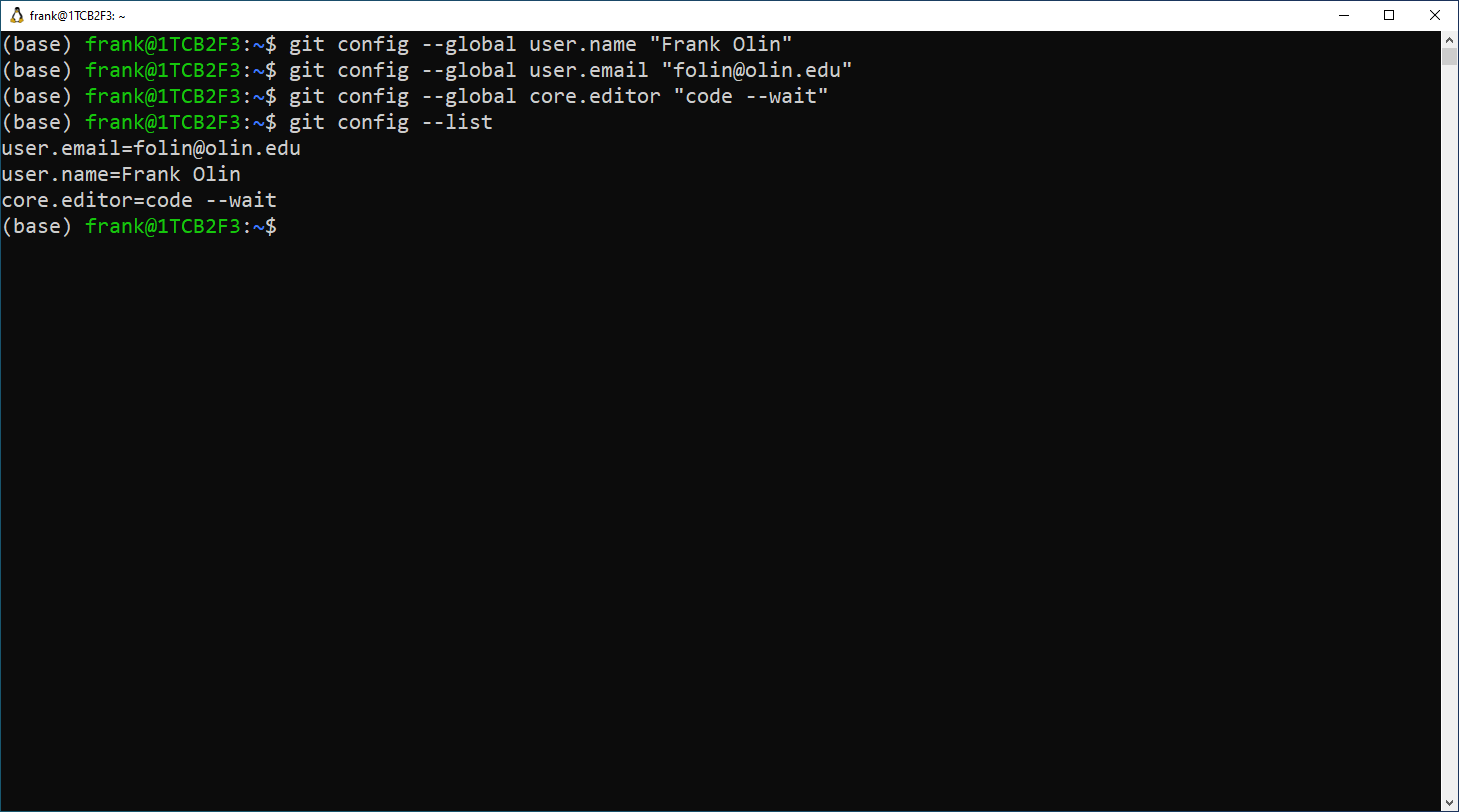
You can check that this process was successful by running git config --list.
If you see lines starting with user.name, user.email, and config.editor
with the values you expect, then the process was successful. You may see other
parts of your configuration, but you can ignore these.
Add an SSH key to GitHub #
Context #
Sometimes, when interacting with code on GitHub (including your own), you need to authenticate yourself to GitHub. To do this, you will set up credentials on your computer in the form of an SSH (Secure SHell) key. The process consists of two steps: creating the key on your computer, and telling GitHub what this key is.
Directions #
To create the key, open Ubuntu in GWSL and run the command ssh-keygen -t ecdsa. You will be presented with a series of prompts; unless you know what
changing these prompts will do, you should use the default settings (just hit
Enter) for all of them. (In this case, it is fine to use a completely blank
passphrase for this process.) This will create two files id_ecdsa and
id_ecdsa.pub. Never share the contents of id_ecdsa with anyone. Doing so
after you have added the key to GitHub will allow whomever you share the file
with to authenticate to GitHub as you with no password necessary.
To add the key to GitHub, log into your account on GitHub. Click on your profile picture in the upper-right corner of the page and select Settings. Click on “SSH and GPG keys”, and then click on the “New SSH key” button to get a form you can fill with the details of your key. For “Title”, use a name that will help you remember the computer that you are currently setting up.
For “Key”, start Ubuntu in GWSL and run cat .ssh/id_ecdsa.pub. You can
highlight this text and press Ctrl-C to copy the text. (If you have highlighted
text in WSL, Ctrl-C will copy text to your clipboard instead of stopping a
program.) then, paste the text into the field. When submitting this form, you
will likely be asked to reconfirm your GitHub password.
Check #
Open Ubuntu and run the following command:
ssh -T git@github.com
You may see a message that asks if you want to continue connecting. If you do,
type yes and press Enter to continue.
You should then see a message that says something like
Hi (user)! You've successfully authenticated, but GitHub does not provide shell access.
If instead you see Permission denied (publickey)., you should make sure that
your SSH key was correctly pasted into GitHub earlier. If not, you can set up
they key again on your GitHub account.
End #
Once you have done this, you should be properly set up to complete Assignment 0.
In general, if you need to start VS Code in this course, you should do so by
running code in Ubuntu, as it tends to avoid some oddities that can
occasionally come up.
Bonus #
Since you read all the way to the end of this page (or maybe you just skipped down using the table of contents, but whatever), here’s a fun Python-related XKCD:

Source: https://xkcd.com/1987/
Troubleshooting #
No Network Access in Ubuntu #
Examples of this occurring in the computational setup:
ping olin.edudoes nothing- Cannot download Anaconda/Quarto with
wget
This is due to the firewall installed on your Olin laptop blocking network
access to WSL. As of Spring 2022, Olin uses Symantec for its firewall. You can
temporally disable Symantec. Press Win-R on your keyboard. A window called
“run” will open in the bottom left. In the text box, type smc -stop. Windows
will ask if you want Symantec to make changes to your device. Select
yes. Symantec will be temporally disabled.
VS Code Complains It Cannot Use the Python Extension #
The WSL Remote extension creates multiple profiles for VS Code, one for Windows (local), and one for every version of Linux you have installed for WSL (remotes). What is most likely happening here is the Python extension is installed under the local profile. It needs to be installed in the remote profile to work.
To fix this, open a VS Code window, make sure it says WSL: Ubuntu in the
bottom left corner. If it does not say WSL: Ubuntu in the bottom left, click
the little green square in the bottom left. A menu will open at the top of VS
Code, select New WSL Window.
In your WSL VS Code window, navigate to the extensions manager (File -> Preferences -> Extensions or press Ctrl-Shift-X) and install the Python
extension. Now the Python extension should be installed in the WSL remote.
GWSL Does Not Work (python -m pygame.examples.aliens)
#
This is most likely an issue with Windows Defender’s firewall. For GWSL to work, you MUST give GWSL’s XServer and PulseAudio server access on public networks.
To fix this, open the GWSL menu and select about (it’s located at the bottom
right of the menu). You will see the following submenu:
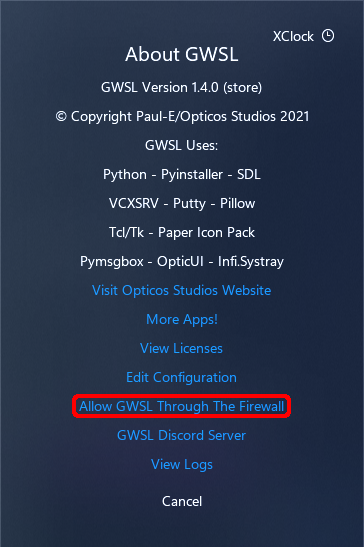
In this menu, click on Allow GWSL Through The Firewall. Two windows will
open: one is an informational blurb from GWSL, the other is a Windows Control
Panel. You can close the blurb.
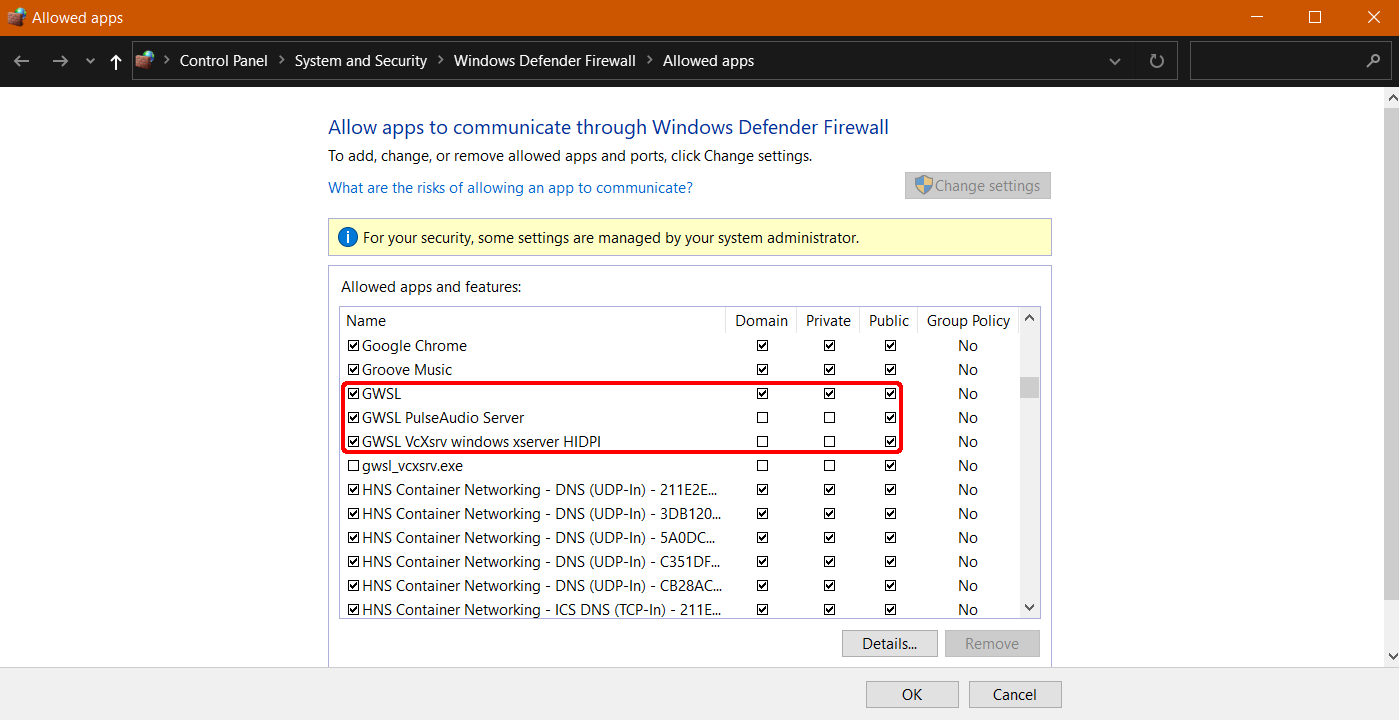
In the Control Panel window, click the button which says Change Settings. Now
scroll down until you find GWSL PulseAudio Server and GWSL VcXsrv windows xserver HIDPI. For these two items, make sure to check the boxes under
Public. Click Ok. To test if it’s working, run python -m pygame.examples.aliens again.
If it is still not working, contact a course assistant.