Reading 4: Using and Sharing Code #
As a software designer, you should gain some familiarity with using other people’s code, including code written by direct collaborators or included as part of an external library. You should also become familiar with sharing and explaining code to others.
As part of this, you may be required to generate, gather, process, show, or explain data. These tasks are a core part of software design work, even if they may not be explicit tasks. For example, you may be asked to show that rewriting code a certain way makes it run faster than before, or explain to what extent adding a new feature increases user engagement with your application or service.
To help you build these skills, this reading begins by discussing how to import code from other files and provides an overview of some convenient portions of the Python standard library. We then discuss some features of Python functions that may be helpful as you read external documentation. After this, we will switch gears to talk about reading and writing files in Python, which is a skill that you will likely find yourself using often as you generate or process data. Finally, we will end this reading with a discussion of computational essays and data visualization, which may be helpful as you share and explain your code to others.
Using Existing Code #
As you develop more complex code, you may find yourself implementing similar
functionality repeatedly. For example, in the average_value function above,
you saw that we added a list of numbers together by defining a variable to hold
the running total of numbers (total_sum) and used a for loop to add each
number in the list to this total.
Implementing the same functions over and over can be helpful for building good habits, but is generally not an efficient way to develop software. In this section, we talk about ways in which you can reuse existing functions to write cleaner and more efficient code.
Using Try & Except Statements #
A try & except statement can be used to handle any errors that are potentially
expected as the result of a certain function. There are two parts or “blocks”
that make up this construct: the “try” block contains the code that you want to
run, but might expect a specific exception to occur in. The “except” block is
what runs once the type of exception specified shows up in the code.
When the code is run, it will first attempt to complete the code in the try statement. If there are no issues, the except section will be ignored; however, if an exception occurs, the execution will jump to the except clause & continue from there.
A try statement can have more than one except clause, where the various except clauses handle different types of exceptions; generally you do not want to use a “generic” except clause without specifying the type of exception you are handling. If there is no except clause corresponding to the type of exception that occurs, the program execution will stop (much like a normal error).
def input_divide():
  try:
    input_1 = int(input("Enter an integer."))
    input_2 = int(input("Enter another integer."))
    div = input_1 // input_2
    print("Result: ", div)
  except ValueError:
    print("Not a valid integer; try again.")
    input_divide()
  except ZeroDivisionError:
    print("Please make sure that the second integer is not zero.")
    input_divide()
Note that multiple errors can be handled in one block (for examples,
except: ValueError, ZeroDivisionError) or all errors can be handled with just
except:, though the latter is considered bad style.
More Common Functions and Methods #
Python has a number of built-in
functions that are, for
the most part, always available in the interpreter and in programs. (You can
technically overwrite these functions by assigning to them, but you shouldn’t.)
You have already seen a few of these functions already: the often used print,
range, and len, as well as type conversion functions such as int, str,
and list.
Using these functions is recommended for two reasons. First, they are more
convenient: it would be a pain to have to write a for or while loop every
time you wanted to find the length of a list or string. Second, they are
typically implemented in a more efficient way than most Python programmers would
be able to do, so they will usually run faster and require less memory.
Below, we list a few built-in functions that you might find useful.
isinstance: Check a Type
#
The isinstance
function takes a variable and a type. It returns True if the variable is of
that type and False otherwise.
>>> isinstance("abc", str)
True
>>> one_two_three = [1, 2, 3]
>>> isinstance(one_two_three, int)
False
join: Concatenate a String List
#
The join method of
strings allows you to concatenate a list of strings into a single string:
# This returns "Use the Force"
" ".join(["Use", "the", "Force"])
As you can see, the string you use before the .join part of the function call
is used in between items in the list. If you want to quickly concatenate a list
of strings without any separation between them, you can use the empty string:
# This returns "R2-D2"
"".join(["R", "2", "-", "D", "2"])
enumerate: Loop through Indices and Values
#
The enumerate
function allows you to loop through a sequence’s numerical indices and items at
the same time. Similar to the items method of dictionaries, the for loop
used to do this has two variables.
number_words = ["zero", "one", "two"]
for index, word in enumerate(number_words):
    print(f"{index} is called {word}")
This code prints the following:
0 is called zero
1 is called one
2 is called two
Import Statements #
You have already seen in worksheets and assignments that you can use code from
.py files in Jupyter notebooks without having to copy and paste the code into
a notebook cell. You did this using the syntax from X import Y, where X was
the name of a file and Y was the name of a function or variable to import.
In general, you can use the import keyword to make code in other files
accessible to the current file, whether you are working in a Jupyter notebook or
in a Python file. There are two ways to use the import keyword:
from X import Yimport X
where X is the filename and Y is the function or variable defined in X. In
a Python file, these lines should be placed at the top of the file.
For now, you should assume that file X must be in the same directory as the
file you are importing into, with one exception that you will see later in this
reading. (There are ways to access files in a different directory, but that’s a
topic for a later reading.)
You have already seen import statements of the form from X import Y, which let
you use Y as if it were defined in the current file. You can import multiple
things X this way, using something like from X import Y, Z.
Import Syntax Tradeoffs #
You should be careful when you use from X import Y that you do not also have a
variable called Y in your code. If this happens, the one that was defined
later will overwrite the previous one. In Jupyter notebooks, it can be
especially easy to do this, since import statements do not all appear at the
top of a notebook, and the order in which you run cells matters.
You may also see from X import * on Q&A sites. As in Bash, the asterisk (*)
is a wildcard that matches anything, and thus this statement will import
everything from X. You should not use this form because it is much harder to
keep track of what is being imported (and what you might overwrite in your
code).
A safer way to import code is to use the form import X. This will make all the
variables in X available to you, but you access those variables slightly
differently. Rather than using the variables Y and Z, for example, you would
use X.Y and X.Z. This method is more tedious to write but avoids the
overwriting issues mentioned above.
Import Syntax Example: Unit Testing #
Suppose you have a file called average.py that contains a function called
average_value, and you
want to write unit tests for this function in a file called test_average.py.
To make sure that you can access the average_value
function from test_average.py, you need to use an import statement like this:
from average import average_value


def test_ones_average():
    assert average_value([1, 1, 1]) == 1.0


def test_single_average():
    assert average_value([1]) == 1.0
Or, if you used a plain import statement:
import average


def test_ones_average():
    assert average.average_value([1, 1, 1]) == 1.0


def test_single_average():
    assert average.average_value([1]) == 1.0
The Python Standard Library #
Beyond built-in functions and methods, Python provides a standard library with commonly used functions for convenience. These features are split into different modules, each of which you can import using the syntax above. You can view the entire library here.
The math module provides some
common math functions , such as ceil and floor (which round up and down to
the nearest integer, respectively), sqrt (which takes the square root of a
number), and the standard trigonometry functions. It also provides some useful
constants: inf represents infinity, and pi is the well-known constant that
begins with 3.14.
The random module provides
functions to generate random numbers, including ints (randint) and floats
(random or uniform). It also provides functions to pick a random element of
a sequence (choice) or to put the elements of a sequence in a random order
(shuffle).
The string module provides
functionality to build specifically formatted strings (though much of this
functionality can be done with
f-strings). It
also provides helpful strings that represent different sets of characters, such
as all uppercase letters (ascii_uppercase), numbers, (digits), and
punctuation (punctuation).
The collections module
provides a variety of container data structures designed for holding items.
While most of them have fairly specialized use cases, one is rather helpful in
many situations: defaultdict. This essentially allows you to create a
dictionary that assumes a default value for any key not in it. This saves you
the trouble of checking whether something is in the dictionary before using it:
from collections import defaultdict

letter_count = defaultdict(int)
sentence = "King Philip Came Over For Great Spaghetti"
for character in sentence:
    # Any key not in letter_count is mapped to 0 when you try to access it.
    letter_count[character] += 1
As you progress through this course, we will discuss a few other modules that will be useful on future assignments and projects.
External Documentation and Python Function Syntax #
As you continue to learn Python, you will inevitably find the need to learn and use external libraries. Most libraries with a reasonably large community will have documentation for their functions, and the description of a function’s parameters and return types are often presented in a specific format.
In this section, we will list a few features of Python’s syntax that may be helpful in understanding external documentation.
As you read through documentation and with reading and writing files, you will
see uses of two Python features you may be unfamiliar with: default arguments
and keyword arguments. (See the official documentation of
print for an
example.) A few of the libraries whose documentation pages we link to have
functions that make extensive uses of these features, and thus before getting
into these libraries, we explain what default arguments and keyword arguments
are.
Default Arguments #
A default argument is a way of making a function parameter optional, setting it to some default value if the argument is not provided. Here is an example:
def answer_to_life(number=42):
    return f"The answer to life, the universe, and everything is {number}"
Notice that we write number=42 as a parameter, with no spaces around the
equals sign (=). This means that we can call the function one of two ways:
with an argument, like answer_to_life(27) or simply as answer_to_life(). If
we use the latter, number is set to 42 by default.
Keyword Arguments #
Some functions have many parameters with default arguments, like this:
def many_default_arguments(param_1=42, param_2="spam", param_3=True,
                           param_4=3.14):
    # Do things here...
    pass
If you just wanted to use a different value for param_4, it would be tedious
to use the default values for every other parameter, like this:
many_default_arguments(42, "spam", True, 1.618)
To avoid this syntax, you can use a keyword argument, which allows you to define the values of specific parameters. Visually, it looks quite similar to a default argument, except that it is used when calling the function:
many_default_arguments(param_4=1.618)
This leaves the other arguments as their default values.
Argument Lists #
If you look at the official documentation of
print, you will see
the following:
print(*objects, sep=' ', end='\n', file=sys.stdout, flush=False)
The *objects means that you can pass any number of arguments to the function,
like this:
# This prints "Hello, I am 42 years old"
print("Hello, I am", 42, "years old")
In external libraries, you may sometimes see this written as *args to indicate
that you pass some number of arguments.
If your arguments in a list, you can pass it directly to the function using a similar syntax:
# This prints "Hello, I am 42 years old"
words = ["Hello, I am", 42, "years old"]
print(*words)
Here, the asterisk (*) essentially “breaks down” the list into separate
arguments before passing them to print. If you already have arguments to a
function in a list or tuple, you may find this syntax easier to use.
Argument Dictionaries #
If you look at the official documentation of the format method for
strings (a
precursor to f-strings), you will see the following:
str.format(*args, **kwargs)
The **kwargs indicates that the function can take an arbitrary set of keyword
arguments, like this:
intro = "Hello, I am {age} year{plural} old".format(age=42, plural="s")
Here, as long as the variable shows up in the string, you can set its value as a
keyword argument in format.
Similarly to how you can use * with a list when passing it to a function that
takes an argument list, you can use ** with a dictionary to pass it to a
function that takes keyword arguments, like this:
age_details = {age: 42, plural: "s"}
intro = "Hello, I am {age} year{plural} old".format(**age_details)
File Input/Output #
In the context of computing, you are likely familiar with the term file as some data that is stored as a unit on your machine, like a document, application, or video. However, a file is simply a way to store or record data, just like a file of paper documents. In the UNIX family of operating systems (of which Linux is one), nearly everything is treated as a file: directories, a network device like a wi-fi card, USB drives, and HDMI ports are simply treated as devices that the computer can write data to or read data from. This is an example of abstraction: by treating all of the above as files, they can be written to or read from in almost exactly the same way, using the same set of functions.
Below, we describe the elements of a file and the ways to work with them.
File Paths #
A file’s path provides two important pieces of information about a file: what
it is called and where on your machine it is located. You have actually already
seen paths in this course: ~/softdes/foo.py is a path, for example. That path
describes the file location: within the current user’s home directory (~), in
the softdes directory, the file foo.py is the one that this path represents.
The file’s name is a bit trickier: we would colloquially call this file
foo.py, but to differentiate from a different file named foo.py in another
directory, the file’s name is actually the entire path (~/softdes/foo.py).
(As an aside, the file’s location is also not completely straightforward, since the file data is actually stored on a device like a hard drive, and the location of the data on this hard drive is not always sequentially organized. That being said, the operating system takes care of this for us, so we can treat the path as being the definitive location of a file.)
The os.path module of the
Python standard library provides some convenience functions for working with
paths. Its functions work on both UNIX operating systems as well as Windows.
This can be useful, because among other things, Windows writes paths with
backslashes(\) instead of forward slashes (/), such as in
C:\Users\admin\Documents.
open and close
#
There are two ways to access a file: reading data from it and writing data to it. Both are core operations to data processing. For example, if you are writing a Markov text generator, as you already did in a previous assignment, reading a source text from a file allows you to simply download a text from the Web and load its contents into your program to be able to generate random text.
In Python, to read from or write to a file, you need to ask the operating system
to provide you access to it first. You can do this by using the built-in
function open, which provides you with a file object that you can use to
access the file. The “Reading and Writing
Files”
section of the official Python tutorial describes how to do this. You should
read this section before moving on.
The built-in function close tells the operating system that you no longer need
access to the file. Forgetting to close an open file is a common mistake, and in
rare cases can have confusing or catastrophic consequences. If another program
is trying to write to a file before your program has closed it, for example, the
file contents may be what your program wrote to it, what the other program wrote
to it, some combination of the two, or something entirely different. To avoid
this, we recommend always using the with form of opening files, like this:
with open("foo.txt", "r") as f:
    # Do stuff with the file here...
read and write sometimes have better alternatives
#
Once you have an open file, you need to actually read the data into a form that
can be used by the rest of your program, such as in a string. The “Methods of
File
Objects”
section of the official Python tutorial describes ways to do this using the
read and write functions. You should read this section before moving on.
As the documentation mentions, you can use f.readlines() on a file object f
to get a list of strings representing every line in the file. But if the file is
large, this can slow your machine down quite a bit. Because of this, you are
strongly recommended to use the for line in f: syntax:
with open("foo.txt", "r") as f:
    for line in f:
        # Do something with line here, like the following.
        print(line.strip())
The only thing that you should be aware of if using this syntax or
f.readlines() is that each line will have a newline character (\n) at the
end of each line (except perhaps the last), so you should use the strip
function to get just the text of the line. If you used print(line) in the
example above, you would instead get an extra blank line between every line in
the original file.
For writing to files, you need to add the newline character yourself to start a
new line if using f.write(). If you are writing a file line by line and want
to have line breaks added for you, as print does, use this syntax instead:
print("Hello world!", file=f)
The file=f keyword argument here tells Python to write Hello world! to the
file object f instead of to the screen (sometimes called standard output or
stdout).
Computational Essays #
As you become more experienced in software design, you may want to share your code with others in a way that allows them to understand, use, and build on your code. One powerful way to do this is through a computational essay, which is a document that intersperses text and code. Through this format, you can describe your work to others in a readable way while also providing a way for the reader to run your code and visually see the results.
You have already used one format for a computational essay in this course: Jupyter notebooks. Other fields of engineering may use live scripts, which is the equivalent concept for MATLAB. One of the oldest forms of the computational essay as we know it is Mathematica, which was started by Stephen Wolfram (of WolframAlpha fame, among other things).
To help you get a better sense of what a computational essay might look like and how to write a compelling computational essay, we recommend that you read Wolfram’s own essay on the subject, and you should do this before you move on.
Data Visualization #
For the last part of this reading, we want to reiterate or build on points made in Wolfram’s essay, particularly in the area of data visualization. Simply getting and processing data is not always enough - often, the most important task is to make a compelling point with data. To effectively do this, you should learn different ways of visualizing data.
For this purpose, we will use Matplotlib and Pyplot. Matplotlib is a plotting library for Python whose syntax is designed to be relatively similar to the plotting syntax of MATLAB. Pyplot is a part of Matplotlib that is particularly well-suited for interactively working with plots, as you often do in Jupyter notebooks.
In this section, we will point you to some resources for learning these libraries, and provide some tips on how to effectively visualize data.
Prepare a Jupyter notebook for plotting #
By default, plots in a Jupyter notebook will not be shown in the notebook itself. To make plots appear within a notebook, you will need to add and run a cell with the following code at the top of your Jupyter notebook:
%matplotlib inline
As with the code that you run to make VS Code read the latest version of files, you will need to run this every time you start or restart your notebook.
Learn Matplotlib and Pyplot #
Matplotlib includes some excellent tutorials, which you should go through to learn about how to use the library. We recommend you read the tutorials below in order:
- Pyplot tutorial
- Usage Guide (up to, but not including, the “Backends” section)
- The Lifecycle of a Plot (optional, but helpful as an example)
Contextualizing Plots #
Though the tutorials above explain a good deal about how to create and work with plots, they don’t say much about what actually makes a good plot.
By far the most important thing to know as when you design and create a plot is the point you are trying to make.
Here is a set of two plots from the Pyplot tutorial:

We don’t know the point this graphic is trying to make for a number of reasons: (1) we have no idea what the numbers on the $x$ or $y$ axis represent, (2) the plot doesn’t have a title, so we don’t know what the overall plot is showing, and (3) we don’t have the context, so we don’t know why we are seeing this plot.
The purpose of a plot is to provide evidence or support for a claim you make. So for example, suppose that you have two swings, one of which is rusty, and claim that the rusty swing stops earlier than the other. You could conduct an experiment to analyze this: sit the same person on each swing in turn, start them forward of center, and release them, tracking their distance from the normal hanging center of the swing over time. Then, saying that the blue plot represents the position of the person in the more rusted swing over time gives more credibility to your claim.
In general, always explain the point of your plots with proper context, especially when making them publicly accessible.
Labeling Plots #
While we now know what the point of the above plot is, we still don’t know some key details. How heavy was the person sitting in the swing? How long did you track their position for? Is their position measured in feet, inches, or meters?
To make sure that the plot effectively provides evidence for a claim, this type of information is necessary. However, not all of it has to be included in the plot itself. Typically, it’s best if the plot includes at least a title and a labeled set of axes.
If we adapt the code used to produce the two plots above, we can get a plot that looks like this:
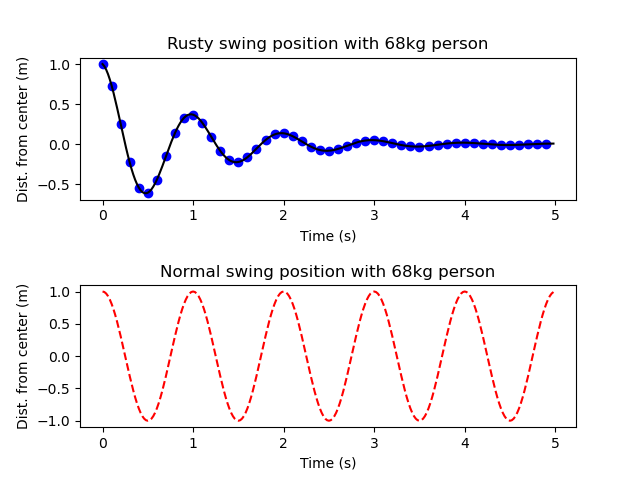
Now we can clearly see what each plot is showing and that they are plotting the same units, making it easier to quickly compare the two sets of data visually. In general, it’s important to show both the quantity represented and the units when labeling axes. (The exception is if the quantity has no units.) In addition, you should choose a title that simply describes what the data represents, not the point that you are trying to make. However, you should also make sure that you do not simply state what the data is; in the figure above, titling one of the plots “Swing position over time” would be too vague, particularly since both plots can be described this way.
Explaining Plots #
Beyond properly labeling the plots and making a point, it’s important to highlight the important parts of the plot so it’s clear how the plot provides evidence for your point. Don’t assume that the reader will just make the connection on their own. For example, you might write the following after showing the plot above:
The above figure shows the positions of the two swings over time. As we can see, the rusty swing shows a clear decrease in the distance from the center over time, with the peak distance at less than 50cm from the center at 1 second. The normal swing, on the other hand, has almost the same distance (if not the same) even at 5 seconds, when the rusty swing has almost stopped moving.
This explanation makes it very clear how the plot connects with your claim, and the plot itself includes enough precise information to effectively back up your claim.