Final Project: Interactive Programs #
Introduction #
Almost all of the code that you have seen in the course so far has been non-interactive. Though you may have interactively executed code in a Jupyter notebook, the code itself typically did not request input from you as it was running. In this final project of the course, we’d like you to build a substantial piece of software that is interactive in some way. As you do this, you will also get the chance to practice your skills at object-oriented design, organizing your project idea into a series of classes that work together to achieve complex functionality.
Project Summary #
In this project, you will be applying your Python knowledge (and hopefully learning a new library or two along the way) to build a program that interacts with users as part of its behavior. In terms of design, interactivity is essentially the only constraint for this project - you can use interactivity in a huge range of applications, and you can choose any kind of program you’d like (within reason).
As with the previous project, you can work individually or in groups - up to three students are permitted on a single team. Scoping your idea will be even more important than for the midterm project, and you should be careful not to attempt too little or too much for this project. The milestones throughout the month-long span of this project are intended to provide you with appropriate scaffolding to help you find an interesting and appropriately scoped project to work on.
We hope that this project is a chance for you to demonstrate what you have learned over the semester and to get a deeper insight into what you can do with a knowledge of software design, as well as the process that it takes to get there.
Project Category Suggestions #
Below are a few broad categories of interactive programs that you might consider building for this project. While you do not have to do a project that fits into one of the categories below, we have found that most of the past projects in this course fit into one of these categories.
Please note that the student projects from Spring 2020 were done over a significantly longer time frame (around 2 months), and projects from Fall 2020 were done over 4 weeks. All projects from subsequent semesters were done on a similar time scale to yours (2-3 weeks).
Interactive Data Visualizations #
If you enjoyed visualizing data in the midterm project, you should consider creating an interactive data visualization, which will give you an opportunity to further explore the world of telling stories with data.
An excellent and currently relevant example of a project in this area (though one that is likely beyond the scope of a one-month project) is the article What Happens Next? COVID-19 Futures, Explained with Playable Simulations by Marcel Salathé and Nicky Case. In this article, the authors provide a series of simulations to model the spread of COVID-19 under various scenarios. The interactivity comes from the fact that in many of these simulations, you can adjust various parameters (even while the simulation is running) to see how they effect outcomes such as peak cases, deaths, or times to reach herd immunity.
Note that unlike in the midterm project, you do not need to fetch your data from a source on the Web - you can instead choose to generate some of your own data. For example, you could get real-time data from a sensor (such as your laptop’s CPU temperature) and provide a continually updated visualization of this data that the user could interact with in various ways.
Video Games #
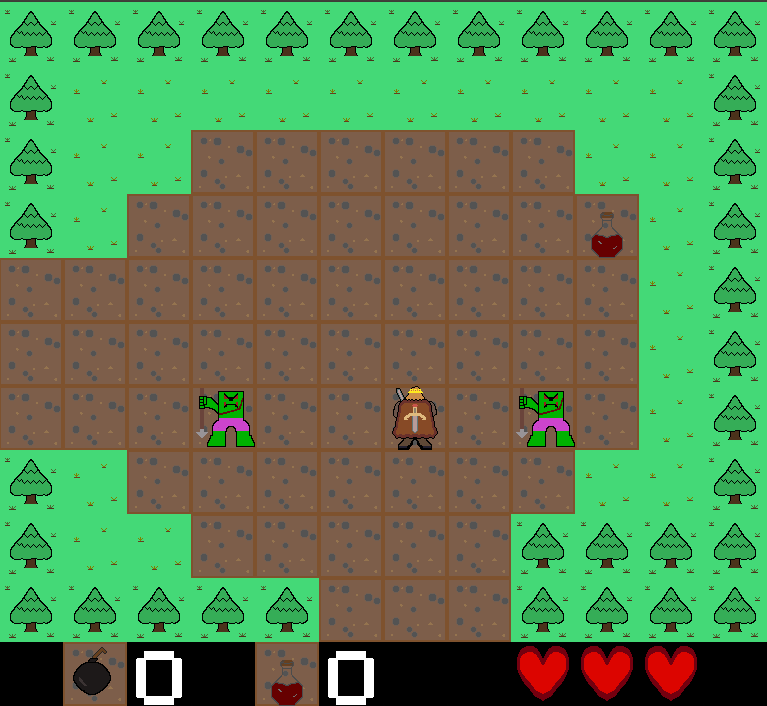
Video games are interactive by nature. If you have been curious about what it would be like to design a game of your own, this project could be your chance to try it out. Spring 2020 students took this opportunity to make a clone of The Legend of Zelda:
As well as the racing game Out Run:
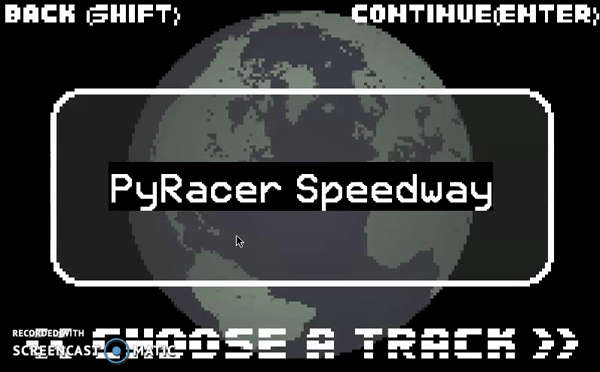
Credits to Oscar de la Garza and Nabih Estefan Diaz for Medieval Quest (above), and to Patrick Ogunbufunmi and Tolu Oshinowo for PyRacer (below).
Games from Fall 2020 include Misguided: the Game.
You do not have to make a real-time game, either. You could instead make a turn-based game, like a software version of the educational card game Phylo:
Interactive Art #
Creating an interactive piece of artwork offers a wide range of possibilities. By using a computer vision library (described more below), you could create a series of filters that can be applied to a webcam feed, or allow someone to remotely play an instrument like a synthesizer by simply pressing their fingers at the right spot on a nearby flat surface.
If you want to see some impressive (and certainly out-of-scope) examples for inspiration, we encourage you to check out screenshots and videos of the exhibits at the teamLab Borderless Museum in Tokyo.
Tools and Applications #
Another possibility you can explore is to build an interactive tool or application. This may be an interactive script (for example, a flight search tool that you can run from the command line) or a full-fledged Web application. The scope of this category can vary based on what technologies you are already familiar with (for example, a Web application would require some preexisting knowledge of Web development), but it is an opportunity for you to build something that is functional and useful for you or those around you. Here is a Craigslist-like site that previous students built:

Credits to Jasper Katzban, Jonas Kazlauskas, and Kelly Yen for developing Frank’s List.
The Solidworks Macros project from Fall 2020 shows how you can create a tab blueprint in SolidWorks by specifying a few of the dimensions of the part. Credit to Linda Hu for this project.
Project Deliverables #
There are five deliverables for this project:
- Architecture Review
- Code Review
- Implementation
- Website
- Video
Below, we explain what each component involves.
Architecture Review #
You can think of the architecture review as an extended project proposal. In short, you must answer a few questions about your project, its basic design, and how it meets the project goals.
The specific questions will be posted in the relevant Canvas assignment for this milestone. The more detailed you can be regarding details like your ideas, classes, attributes, and methods (including inheritance among classes), the more guidance we will be able to provide.
You are welcome to write pass for any of your classes or methods, provided
that the overall structure of your project is clear. We will assume that
functions, methods, and classes work as intended, but you should have a clear
idea in your mind about how the components of your project will work together.
This means that while it isn’t necessary to have every parameter type and return
value worked out, more detail often is more helpful for our conversation.
We are specifically looking to answer some (but not all) of the following questions:
- How do the components of your software work together to achieve its functionality?
- What are the risks or unknowns that you may face as you work through your project, and how can you address them?
- What are the primary technical problems that you will tackle in this project, and how are you approaching those problems?
- How do you envision the user interacting with your software, and how does the design of your project facilitate this interaction?
The architecture review is scheduled to last around 5 minutes, and thus efficient use of time will be extremely important. Your architecture review materials are due before the architecture review session. You should submit any materials you want us to review and any context necessary for us to understand your work, along with any questions or topics you want to cover during the meeting. You should also come to the meeting prepared to facilitate the review, including having the appropriate materials ready to screen-share (if necessary) and taking notes to help you in the remainder of the project.
Code Review #
The code review is a check-in that serves as an additional milestone later in the project. In this review, you will again meet with your project advisor to discuss your implementation. In this review, it is expected that you will have already finalized the design of your project, and thus will focus mostly on your code itself. Your code review document must answer a few specific questions on what’s changed since the architecture review, challenges you’ve encountered, and how you’ll ensure the quality of the code. Again, the specific questions can be found in the relevant Canvas assignment.
Your code review materials are due before the code review session. Similarly to the architecture review, you should submit any materials you want us to review, with accompanying context and topics you want to discuss in the meeting. You should also come prepared to facilitate and take notes. While debugging can be a part of this discussion, we would encourage you to make efficient use of the limited time for the code review (5-10 minutes) by only discussing debugging problems that have proved particularly tricky.
Implementation #
Your implementation consists of your project code. Your code needs to meet the following criteria:
- It needs to involve at least three classes and at least three files.
- It needs to be structured according to the MVC architecture, unless another architecture is explicitly approved by your project advisor.
- It needs to be interactive (take input from the user). On its own, running code cells in a Jupyter notebooks does not count as user interaction.
Your code should be placed in a GitHub repository within the olincollege
organization, and you should give the instructors access to your repository. The
repository should be appropriately and professionally named, which means its
title should not contain any of the following:
- Your name(s)
- Your project advisor’s name
- The words “SoftDes”, “Final”, or “Project”
- The semester (i.e., “Spring 2025” or some variant thereof)
Your repository should have a descriptive name that indicates what the project
is about, like crypto-arbitrage-finder, and you should use hyphens instead of
underscores to separate words.
You’re strongly encouraged to use our template, https://github.com/olincollege/python-project-template/, to create your repository, as this will ensure that you have the correct settings for Pylint/Black/etc. That being said, ultimately how you structure your code is up to you. Feel free to use any libraries that you may find helpful (a few are listed at the bottom of the page).
Style #
Your code should be written with proper style, and Pylint should not produce warnings when run on your code. We will use the configuration from our template repository to test your code, so please be sure to take a look at it here: https://github.com/olincollege/python-project-template/blob/main/pyproject.toml
Documentation #
As with previous assignments, every class, method, and function should have a docstring in line with what we have seen so far in this course.
Your code should be well-documented so that it is both runnable and
reproducible. In particular, your submission repository should have a file
called README.md written in Markdown. This file should briefly summarize your
project and explain how to run your code. By following the instructions in the
README, anyone else should be able to clone your project code to their machine
and run it.
If you installed any additional packages or libraries, you must mention them
in the README. Ideally, you should also include installation instructions for
these libraries, such as by using the conda or pip commands (which are often
found in the documentation for other libraries). The README for the template
project contains instructions for how to make this process a bit easier:
https://github.com/olincollege/python-project-template/blob/main/README.md
It should also be relatively easy for someone else to use your project. This
means, among other things, that you should avoid “hard-coding” paths such as
/home/user/repo-title in your code, as then someone else would have to change
this to their own folder path before your code will work.
Additionally, you should also avoid using “magic numbers” for the same reason.
If you do have a path such as /home/user/repo-title in your code, and you
repeatedly use that string, someone else would have to change each instance of
it. A better approach would be to assign the path to a variable once, and then
use the variable in your code. This way, someone would only have to change the
value of the variable and could be sure that the rest of your code works as
intended.
If for some reason you do use a hard-coded path, mention this in your README so that others can easily use your code.
Unit Tests #
To the extent possible, you should thoroughly test the code you write. It is not necessary to test every part of your code, as some functionality, like getting user input, can difficult to test (but we are willing to help you test this). Your code should be organized enough that there is a reasonable number of functions that you can test with unit tests.
As each of your implementations will be unique, you will need to create your own test file(s) for this project. You can use the testing files for previous assignments as a starting point for your tests. You are free to write tests in whatever way you choose, as long as you are clear about why you are running each test. Please feel free to reach out to the CAs or instructors if you need help writing unit tests.
You may write a large number of testing functions, or define a list of cases and run a single test that goes through each of those cases as in some previous assignments. If you want to structure tests in entirely your own way, you are certainly welcome to do so as well.
As you write your unit tests, you may find the pytest documentation helpful. If you want a helpful starting point for writing your own unit tests, we would recommend starting with the Installation and Getting Started guide.
Technical Documentation #
As with the previous projects, to help both your future self and others who may want to use and/or extend your work, you should ensure that your code is well-documented. The technical documentation of your project should consist of docstrings for all functions, methods, and classes, as well as a brief README that explains the dependencies and usage instructions of your project.
Website #
Your should also create a simple website that highlights the important aspects of your project, including your video (described below). You should do this via GitHub Pages, which has a number of tutorials and guides that you can use to get started. The core of the website content is written in Markdown, so you should not worry if you have not designed a website before. We will also likely run a more in-depth walkthrough for anyone who is interested during one of the open studio days.
The website should explain your project to a broader audience and draw attention to core features or important findings of the project. This may include information such as the following:
- The big idea or goal of the project
- Unique features of your project
- Screenshots or demos of your project
- Installation instructions (or link to the relevant portion of the README)
- Download links for your project
- A link to your project’s GitHub page
- Information about you (to the extent you are comfortable)
- Attribution for any external resources you used
You do not have to include all of the above information, provided that your website communicates sufficient details of your project to a broad audience.
As examples of this type of site design (though with more content than we might expect), take a look at the project pages for HandBrake, Signal, or Joplin.
Video #
You should summarize your project and its highlights in a 5-minute recorded video presentation. This video should be available on your website.
The video should include slides and clearly state the following four pieces of information:
- What was the main goal of your project, and why did you choose this project? This should be presented in a way that is broadly accessible, even to someone who does not know about your project topic.
- How is your project designed? This may involve showing the breakdown of your project into components and how those components interact.
- How does your project work? You may communicate this by showing a demo, explaining the features of your project in an organized way, or in some other way that makes sense for your project.
- What are the key takeaways of your project? This might include lessons that you learned from doing the work, insights that the audience should get from your project, or a call to action.
As with the previous project, this can be quite a lot of information to condense into a short amount of time, so what you do not present is just as important as what you do present. You will likely have many details that you want to talk about, but do not have time for. We suggest that you practice the presentation with only the key elements required to tell your story, and then add other material as time allows.
Your presentation should be visually appealing, and your presentation should not simply be a description of your project. You should think of your presentation as a way to present the highlights of your project, including the aspects of your work that you are most proud of and most excited by. Think of it as a sales pitch for people to check out your project in more detail.
Since this video presentation is not done live, there is no Q&A session.
Professionalism is important in public presentations. Additionally, while humor and other methods of telling a more compelling or understandable story may be helpful, inappropriate language or disparaging others will not be tolerated. A potentially useful question you may want to ask yourself is the following: if this presentation circulated on social media at the height of my career, how comfortable would I be with that?
Submission #
The architecture review materials are due on Canvas the night before the class where we conduct check-ins. (See Canvas for an exact date.) This gives the instructors time to read and prepare for the architecture review.
The code review materials are due the night before the class meeting typically one week after the architecture review. (As with the architecture review, see Canvas for an exact date.) This again gives the instructors time to read your updates before the code review meeting.
All other project deliverables should be submitted and available in GitHub by the beginning of the final event for this course.
For your GitHub repository, please create a new repository in the
olincollege GitHub organization, which you can find
here. This makes it easy to add the
instructors and CAs to your repo.
Please give this repository a descriptive name as specified above. Ensure your files are visible on GitHub by visiting the repository page and checking your files.
Barring any emergencies, there are no late days for this project. If something comes up that will prevent you from submitting the project on time, contact us as soon as possible.
Assessment and Grading #
A detailed rubric for this project will be made available shortly, but it will be based on the deliverables above, evaluating on criteria such as correctness and style, as previous assignments have been.
Resources #
Below are a few resources you might find helpful for certain project ideas.
Pygame #
If you plan to develop a game, we strongly recommend using pygame, which provides a variety of useful features that are common in game design, such as detecting collisions between objects and refreshing the screen. It is particularly helpful that pygame provides extensive documentation and tutorials for you to use as you learn the library.
OpenCV #
If you plan to work with images (including live data from webcams), the OpenCV library will provide almost everything you need. It is a powerful computer vision library written in C++, but has a Python library to enable you to access its functionality from Python code. Their Python tutorials page has guides for most of the functionality that you would likely look for.